
SoapUI is a useful tool for testing your SOA applications. You may have already used it to test your synchronous services, or, even better, to automate those tests. But did you know that you can test asynchronous BPEL processes using soapUI? This is possible thanks to soapUI's support for Mocking and WS-Addressing. This article will show you how that is done.
Understanding how BPEL processes are exposed and the role played by WS-Addressing
BPEL processes are exposed, by default, as SOAP over HTTP web services. As such, these processes can be tested as easily by soapUI as any other web service. This is trivial when your BPEL processes are synchronous: soapUI will make a request, and can validate the received response. All this happens on the same HTTP connection.
But what if you want to automate unit tests for your asynchronous processes? SoapUI helps a lot in this (not so trivial) task.
It is interesting to note that for an asynchronous process, the response is, in fact, sent as an invocation made from the called process back to its caller. This forces the caller to be able to receive a request for the callback. The caller has to provide the interface expected by the called process so that the response can be delivered. SoapUI has this capability and can act as a server to receive the callback.
The key behind all this is WS-Addressing support by both tools: soapUI and Oracle SOA Suite.
Understanding WS-Addressing
WS-Addressing plays a very important role in Oracle BPEL Process Manager's architecture for asynchronous processes. When an asynchronous BPEL process is invoked, you can specify the callback information using WS-Addressing headers. When BPEL has to make a callback to deliver the asynchronous response, it will inspect those headers and use the specified value to send the response. When a BPEL process invokes another asynchronous process, it automatically sets the headers.
Throughout the article you will see how soapUI, via WS-Addressing, is able to invoke a process and receive the asynchronous callback.
Testing Scenario
The application this article will use to simulate the asynchronous scenario is a very simple asynchronous BPEL process. It copies a received string and sends it as a callback response to the requester. This scenario uses the soapUI to send the request, wait for the callback, and then look for a match between the sent and received values.
The first step in the test is to create a new application in JDeveloper. This test uses the 11.1.1.5 versions of Oracle JDeveloper and Oracle SOA Suite for the sample, but it can also apply to any 11g version of those two products.
Using JDeveloper, create a new SOA Application and name it OTNTestingAsyncBPEL, as shown in Figure 1.
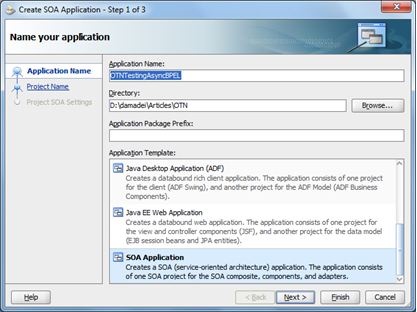
Figure 1- Creating the application
Within this application, create a new project (you should be redirected to the project creation in the next screen):
- Name it AsyncBPELTesting.
- Click next and select Composite With BPEL Process
- Click Finish.
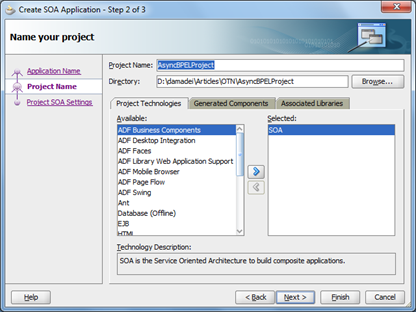
Figure 2 - Creating the SOA Project
You will be prompted to create the BPEL Process. Name it AsyncBPELProcess and make sure its template is "Asynchronous BPEL Process" so that the process will be created with an asynchronous structure, as is mandatory for this scenario.
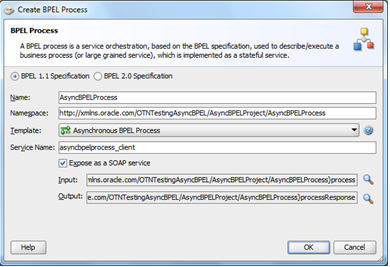
Figure 3 - Creating the BPEL Process
Your BPEL process should be identical to the one in Figure 4. This is a typical async process in which the request is received in a one-way fashion. As determined by the architecture, the client does not get an immediate response; instead, the client is later stimulated by the called process to receive the response via what is known as a "callback," but what is, in fact, a request sent to the caller by the called process.
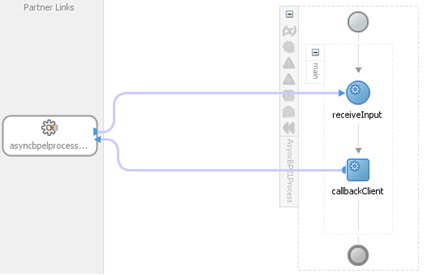
Figure 4 - The created asynchronous BPEL process
Our BPEL process will be very simple: the text received as input will be copied to the output. This received value will be used later to test (using soapUI) if the correct response to the specified request was received. To implement this logic in the BPEL process:
- Create an Assign step and name it copyRequestValueToResponse;
- Edit the Assign and copy the value received by the process/input element (inside the payload of the inputVariable) to theprocessResponse/result element of the output variable, as shown in Figure 5. The outputVariable will be sent to the client when it is used by the callbackClient step.
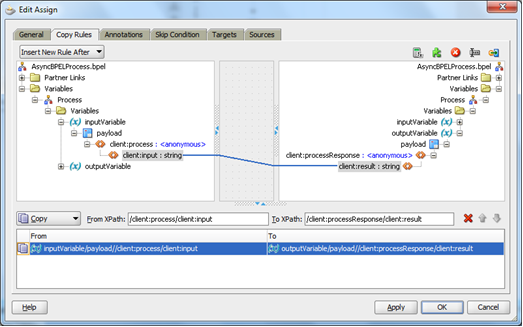
Figure 5 - Copying the request data to the callback response
The project can now be deployed, and a preliminary test can be run. For now, don't worry about the callback.
Creating the Test Project in SOAP UI
The first test will be created simply to start the process. In soapUI, create a new test project by pressing Ctrl+N.
Enter http://localhost:7001/soa-infra/services/default/AsyncBPELProject/asyncbpelprocess_client_ep?WSDL as the URL for the WSDL, and name the project AsyncBPELProjectTest, as shown in Figure 6. The project will be created and two bindings will be available, one for the request and one for the callback.
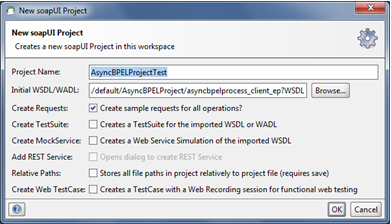
Figure 6 - Creating the SOAP UI project
Expand the AsyncBPELProcessBinding process and open the "Request 1" item. Change the content of the input tag to "First test..." as shown below.
First test...
Submit the request. You should not receive any content as response. After clicking the http log tab in soapUI, the return code received should be 202. This return code means that the request was accepted as per the HTTP protocol semantics. The example below illustrates the logging that can be seen in soapUI:
Sun Nov 13 09:30:38 BRST 2011:DEBUG:<< "HTTP/1.1 202 Accepted[\r][\n]"
Sun Nov 13 09:30:38 BRST 2011:DEBUG:<< "Date: Sun, 13 Nov 2011 11:30:38 GMT[\r][\n]"
Sun Nov 13 09:30:38 BRST 2011:DEBUG:<< "Content-Length: 0[\r][\n]"
Sun Nov 13 09:30:38 BRST 2011:DEBUG:<< "Content-Type: [\r][\n]"
Sun Nov 13 09:30:38 BRST 2011:DEBUG:<< "X-ORACLE-DMS-ECID:
 1b7e5955c26b51de:5a1f5e8a:1339c9c6d49:-8000-000000000000076b[\r][\n]"
Sun Nov 13 09:30:38 BRST 2011:DEBUG:<< "X-Powered-By: Servlet/2.5 JSP/2.1[\r][\n]"
Sun Nov 13 09:30:38 BRST 2011:DEBUG:<< "[\r][\n]"
You can see what happened to the BPEL process by using Oracle Fusion Middleware (FMW) Control to inspect the created instance. Access FMW Control on your server at http://:/em of your SOA Server. For example, in a typical installation the default host and port would be: http://localhost:7001/em.
Inside FMW Control, find the project AsyncBPELProject and click the Instances tab. Your instance will be displayed, as shown in Figure 7.

Figure 7 - Instance created in our first test
Click the instance to display all of the steps it has performed, as shown in Figure 8.
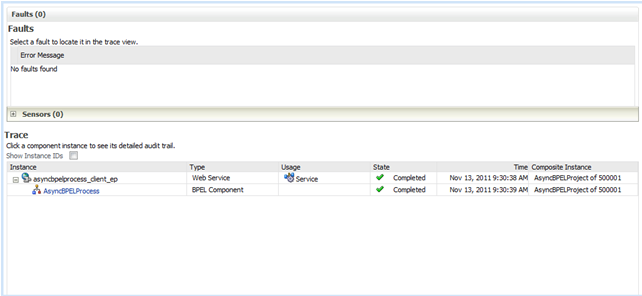
Figure 8 - All steps performed by the instance
By clicking the BPEL process instance, you should be able to see the BPEL flow in a new browser window. Expand the payloadelement inside the callbackClient step and you should see the value we sent inside the processResponse/result element, as shown in Figure 9.
Figure 9 - BPEL Flow
Since we did not specify any callback information, the callback was ignored.
Now let's look at how soapUI can help with testing the rest of this scenario by acting as a server capable of receiving the asynchronous callback.
What happens when an asynchronous response has to be sent to the client?
The asynchronous request / response pattern in a web service is not a traditional request-response. As already mentioned, what happens under the covers is that the client sends a one-way message to the server and the server sends a request back to the client when it has to respond something. The client has to be able to receive the request back from the server. All this is shown in Figure 10.
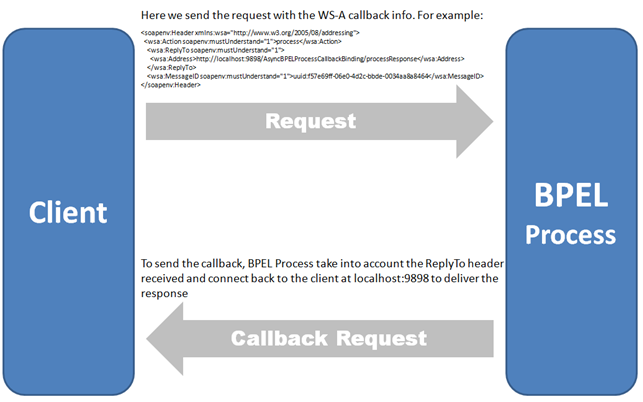
Figure 10 - Asynchronous request/response using WS-A
Let's continue to build the soapUI project to see the callback scenario in practice.
Testing it!
The first step is to create a Test Suite and add a Test Case to it.
- Right click your soapUI project and select New Test Suite, keeping the default suggested name for the test suite.
- Right click the Test Suite and select New Test Case, also keeping the suggested name.
- Click OK.
Your project should resemble Figure 11.
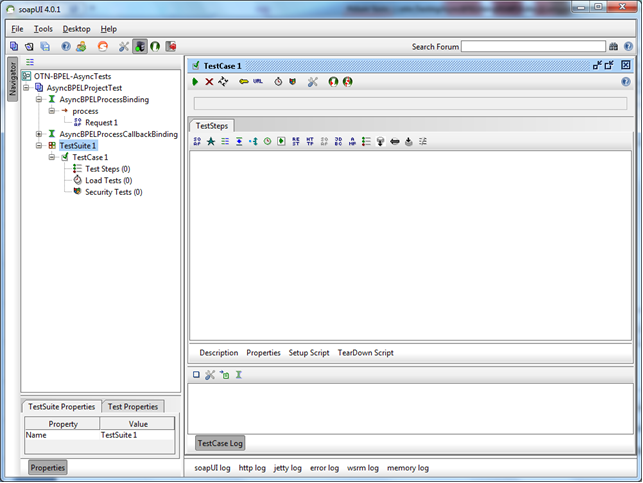
Figure 11 - SOAP UI with a Test Suite and Test Case
Now, do the following to add a Request to your test case:
- Expand the AsyncBPELProcessBinding, process and drag Request 1 to the test steps pane.
- Respond to all soapUI prompts. Confirm all of the questions in the soapUI prompts.
This is (almost) all for the request part of the test. We now have to add a way to receive the response: - Right click Test Case 1
- Select Add Test Step, Mock Response.
- Name the mock response as Mock processResponse. A new window asking you to configure the Mock Response is shown.
- Change the interface to AsyncBPELProcessCallbackBinding, which is the one we have for the callback.
- Keep the operation as processResponse—it's the only one available. (If your process supports multiple asynchronous responses—callbacks, in reality—you could select which operation soapUI should emulate in this step.)
- Enter 9898 as the port. SoapUI will direct the server to start listening at this TCP/IP port. As Path, enter/AsyncBPELProcessCallbackBinding/processResponse, representing the URL path.
Figure 12 shows the final state of the configuration screen. Click OK.
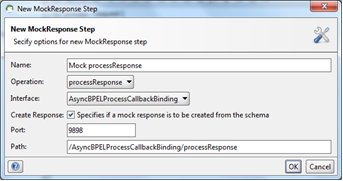
Figure 12 - SOAP UI MockResponse configuration
At this point you may be wondering, "How will the BPEL engine understand that it has to respond to soapUI at the port [9898] and path [/AsyncBPELProcessCallbackBinding/processResponse] we've just configured?" Thanks to standards compliance by both tools—Oracle SOA Suite and soapUI—this is easily accomplished using WS-Addressing.
To specify the WS-Addressing information and inform SOA Suite how to call soapUI back when it has a response to deliver, do the following:
- Open the request process - Request 1;
- Click the WS-A button and check the Enable / Disable WS-A Addressing checkbox;
- Change the Must understand drop-down to TRUE;
- Check the Add default wsa:Action checkbox;
- In the Reply To: section, specify http://localhost:9898/AsyncBPELProcessCallbackBinding/processResponse. This is the address and path we specified in the configuration of the soapUI mock response;
- Select Randomly generate MessageId so that a message ID is randomly generated to correlate the request with the response.
The WS-Addressing configuration should be identical to Figure 13.
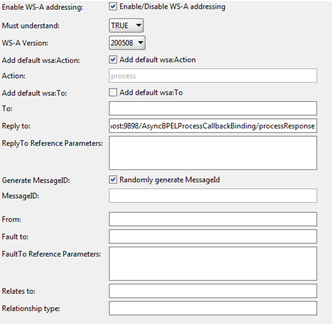
Figure 13 - WS-Addressing configuration
Open the Test Case again and execute it. Both steps should pass without a problem. By opening the Mock processResponse test step, you should see the received response. This shows that Oracle BPEL Process Manager was able to receive the request and call soapUI back to deliver the response asynchronously. You can format the XML so it is easier to be read, as shown in Figure 14.
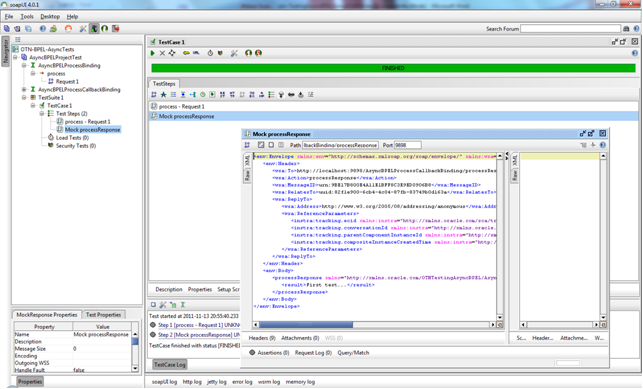
Figure 14 - Response received!
Clicking on the soapUI log tab will display the following messages, showing that soapUI started a server to receive the request (on port9898 with path /AsyncBPELProcessCallbackBinding/processResponse) and mounted a WSDL interface:
Sun Nov 13 20:55:40 BRST 2011:INFO:Mounted WSDL for interface [AsyncBPELProcessCallbackBinding] at
 [/AsyncBPELProcessCallbackBinding/processResponse?WSDL]

Sun Nov 13 20:55:40 BRST 2011:INFO:Started mockService [Mock processResponse] on port [9898] at path
 [/AsyncBPELProcessCallbackBinding/processResponse]

Sun Nov 13 20:55:40 BRST 2011:INFO:Stopped MockService [Mock processResponse] on port [9898]
Adding intelligence to the test
We were able to send a request and, asynchronously, receive back the response. However, how do we know that we received the correct response?
We can use soapUI assertions for that. Go back to the Mock processResponse test step and click the Assertions Tab. Add the following assertions:
- SOAP Request
- WS-Addressing Request. Configure it as shown in Figure 15.
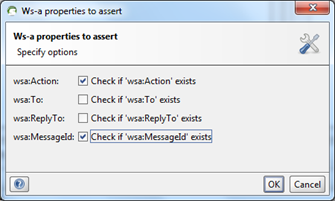
Figure 15 - Asserting that the callback
request is WS-Addressing compliant - Add an XPath Match assertion. This assertion allows us to validate the received request callback. In the XPath Expression section, click the Declare button to automatically declare all namespaces. Find the namespace...
http://xmlns.oracle.com/OTNTestingAsyncBPEL/AsyncBPELProject/AsyncBPELProcess
...and take note of its prefix. Next, enter the following (still in the XPath Expression section)...
//:processResponse/ :result
...whereis the prefix for the declared namespace. For example, if the namespace is declared as the following:
declare namespace ns1='http://xmlns.oracle.com/OTNTestingAsyncBPEL/AsyncBPELProject/AsyncBPELProcess'
...you should specify //ns1:processResponse/ns1:result as the XPath string.
Now we can specify the value we expect inside theelement. The value should be the same as specified in the request:First test.... Your configuration should resemble Figure 16.
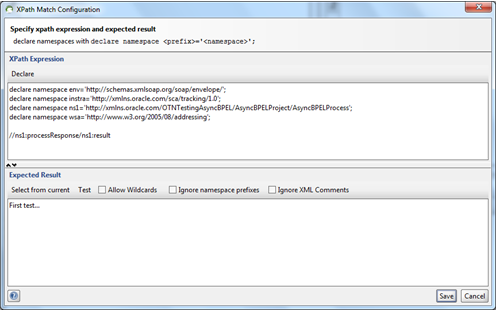
Figure 16 - XPath Match configuration
To make it more fun, we can also add an assertion to the request. For example, we can test if the HTTP code we received was 202 (accepted) — meaning the request was accepted by Oracle SOA Suite for further processing. To do so, add the assertion named Valid HTTP Status Codes and specify 202 as the valid code, as shown in Figure 17.
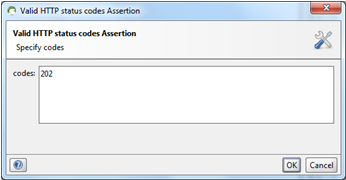
Figure 17 - Valid HTTP return codes
Run the test. You should see both test steps of the test case marked as green, proving they passed all of the added assertions, as shown in Figure 18.
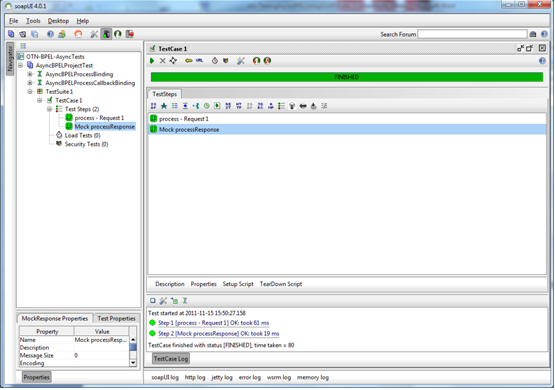
Figure 18 - It passed!
Moving Forward
The test illustrated above is useful. However, for real world usage, it will become quite tedious and error prone to use identical values for the request and the validated response. Wouldn't it be better to specify the value in a single place? Well, this is very easy to be accomplished in soapUI.
The first step to achieve this is to create a property that can be read by all test steps. For that, open the test case and locate the Test Properties tab on the left inferior side of the window, as shown in Figure 19.
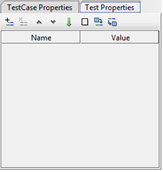
Figure 19 - Test Properties
To add and use the property:
- Click the plus-sign icon and name the property requestValue.
- As a value, enter 123456.
- On the request, change the contents of the element to ${#TestCase#requestValue}. This is a special instruction to read a property that was specified at the Test Case level, named requestValue. The request SOAP message should resemble the following:
- Now, go back to the Mock processResponse test step, open the XPath Match assertion, and add ${#TestCase#requestValue}as the expected result, as shown in Figure 20.
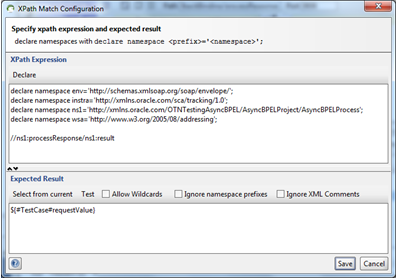
Figure 20 - Assertion based
on the test case property - Now, run the test. It should complete successfully.
- Go back to the FMW Control. You should see that the value specified for the property was sent, as shown in Figure 21.
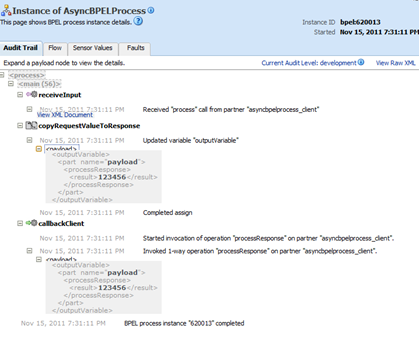
Figure 21 - Property value sent correctly to the BPEL process
Conclusion
Test automation is an essential capability for any project. Thanks to WS-Addressing support in Oracle SOA Suite and soapUI, you can take advantage of test automation to test both synchronous and asynchronous processes.